It has been a busy week and the month of November is going to remain busy.
My Aunt, who generously presents my jewelry at her shows, will be having two
events in November. I will be assisting.
I took my latest creations to work to show what I had been doing and
sold two necklaces and gained one repair job. I have to finish the second
necklace and repair job today. I will try to take pictures.
I have been busy adding links to my RSS feed, which explains in part, why I
have over 300 un-read blog posts in my reader. The new links are available on
the All My Blog Links page under the subtitle New Links. There are 28 new
links, all worth a visit.
I added 3 Polish blogs, and probably would have added more had I had the
time to follow links on those blogs. Check out: Bizuteria by Dominikana
for beautiful wirework, Margita-
hand embroidered jewelry for stunning and bright soutoche, and Haft koralikowy by Jagienkaa for
exquisite bead embroidery.
If you are looking for patterns, don't miss: Gyöngyékszer minták.
I find quite a few links through Lori Anderson's Bead
Soup Blog Party which is where I found: Objects and
Elements a truly awesome site with step by step tutorials. The last
two tutorials were for wearable journals. The step by step instructions
made it look easy to create these metal covered, hinged, journals. What
more could you ask for?
I am at heart a bead weaver. If you want complex multipart tutorials
for big finished pieces, do not miss: Tutoriels perles, Créations Laure.
The link for Bead Perles is
a shop, but they have great interviews with European beaders. What a
great resource.
Finally, I posted a link to my friend Karen
Landis. I expect some day she will be well known.
Sunday, October 30, 2011
Sunday, October 23, 2011
Winnings
Look what I won
This generous 5 pound package is from Judith B Designs. What a treasure trove it is, chips, crystals, lentils, stone, brass, and more. Judy was making room for new purchases and put together this package for a giveaway. This was delivered last week and I intended to blog about it last weekend but this being Cleveland's record breaking year for rain I didn't have enough light to take a decent picture.
Thanks Judy, these will be put to good use.
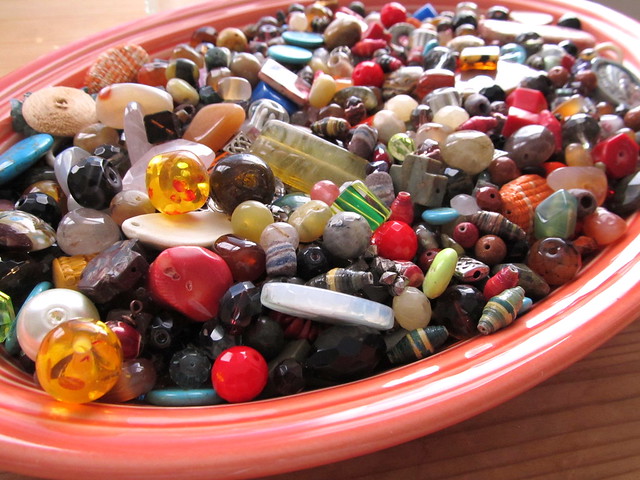 |
| A platter filled with beads |
This generous 5 pound package is from Judith B Designs. What a treasure trove it is, chips, crystals, lentils, stone, brass, and more. Judy was making room for new purchases and put together this package for a giveaway. This was delivered last week and I intended to blog about it last weekend but this being Cleveland's record breaking year for rain I didn't have enough light to take a decent picture.
Thanks Judy, these will be put to good use.
Monday, October 10, 2011
The Plan
Do you design jewelry and in the process redesign and redesign again? I do. Which is why I don’t quite have a bracelet to share with you today.
Several months ago I purchased a pattern for a peyote puffy heart from Kreativ Keller. There is no English translation, but Google translate worked quite well and the diagrams were great. The plan for this weekend was to finally get around to trying out the pattern. Now, that plan worked just fine.
Having successfully made the puffy heart, the plan was to make a bracelet using these silver plated tubes as a quick and simple finish:
The plan also included the use of this carved bone frog as the center of the bracelet:

Plans don’t always work.
Upon reflection the carved bone frog did not fit with the delicacy of the seed bead elements. I am disappointed. I think I have had the bone frog for a few decades. The color was a perfect compliment. The size was just right. However, it just wasn’t going to work and I would not have been satisfied with the finished piece.
New plans were quickly hatched. I rummaged through my box of white beads and found a mother of pearl disk. It was the right size and color. However, when I put it together it was to long for a bracelet. Which means the silver tubes will also be put aside for another day.
The bracelet will now become a necklace, once I make it to a shop and pick up some silver plated chain. Here is the unfinished piece:
I am really happy with the way this turned out. I am also well pleased with the instructions from Kreative Keller, they were well done, easy to interpret and follow, and the design is quite clever.
Several months ago I purchased a pattern for a peyote puffy heart from Kreativ Keller. There is no English translation, but Google translate worked quite well and the diagrams were great. The plan for this weekend was to finally get around to trying out the pattern. Now, that plan worked just fine.
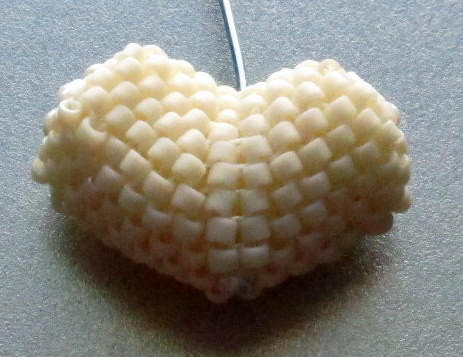 |
| Puffy Heart, pattern by Kreativ Keller |
Having successfully made the puffy heart, the plan was to make a bracelet using these silver plated tubes as a quick and simple finish:
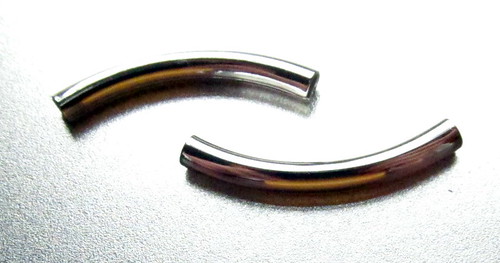 |
| Silver Plated Tubes for bracelets |
The plan also included the use of this carved bone frog as the center of the bracelet:

Plans don’t always work.
Upon reflection the carved bone frog did not fit with the delicacy of the seed bead elements. I am disappointed. I think I have had the bone frog for a few decades. The color was a perfect compliment. The size was just right. However, it just wasn’t going to work and I would not have been satisfied with the finished piece.
New plans were quickly hatched. I rummaged through my box of white beads and found a mother of pearl disk. It was the right size and color. However, when I put it together it was to long for a bracelet. Which means the silver tubes will also be put aside for another day.
The bracelet will now become a necklace, once I make it to a shop and pick up some silver plated chain. Here is the unfinished piece:
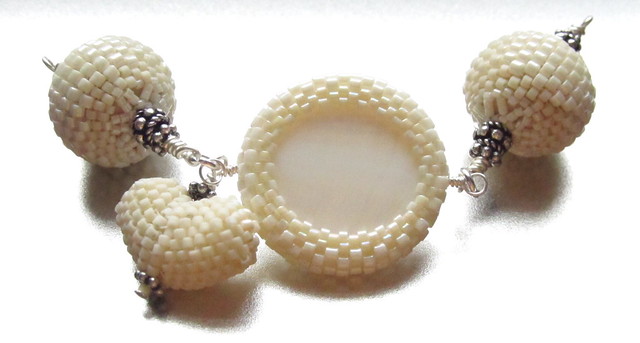 |
| Not Your Mother's Pearls |
I am really happy with the way this turned out. I am also well pleased with the instructions from Kreative Keller, they were well done, easy to interpret and follow, and the design is quite clever.
Sunday, October 9, 2011
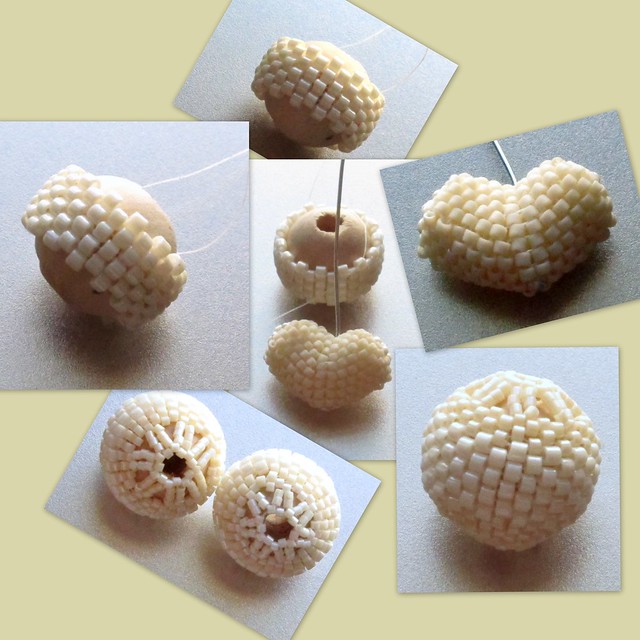
Better Notes on Beaded Beads…
Okay, I should know better than to go from my scribbled notes. I should have remade the darn beaded bead when I was getting ready to post my notes. Corrections and clarifications are in red.
Here are the corrected notes:
The Beginning: Thread 29 size 10 Delicas and tie a knot creating a circle of beads. The tail should be equal on both sides, with needles on both sides.
Size 10 Rows: Peyote 8 total rows of size 10 Delicas; that is 4 rows on one side of that original circle (for future reference this is named the north side) and 3 rows on the other side (this named the south side.)
Size 11 Rows: Peyote 3 rows of size 11 Delicas on the north side and 3 rows of size 11 Delicas on the south side of the beaded bead.
Size 15 Rows: Peyote 1 row of size 15 Delicas on the north side and 1 row of size 15 Delicas on the south side.
Netting Rows: On the north side exit from a size 15 Delica, add 5 size 15 Delicas, skip a size 15 Delica from the final peyote row, and enter the next size 15 Delica from the final peyote row. Rinse and repeat. Assuming my counting is correct you should have 7 scallops. Repeat on the south side.
Note: See my pictures below. On the beaded bead I made today I had to use 5 beads on the south side scallop and 7 beads on the north side scallop.
Final Row: On the north side exit through the middle (3rd) bead of the size 15 netting row, add a bead, and enter the 3rd bead of the next size 15 netting row, rinse and repeat. When the circle is complete pull your thread tight and weave back through your bead work to tie your knot. Repeat on the south side.
Below is a collage of the beaded bead I made today, a heart beaded bead that I will post more about tomorrow when my new bracelet is finished, and the pair of beaded beads showing the difference in the final netted row with 5 beads and 7 beads.
Sunday, October 2, 2011
Notes on How to Create Beaded Beads and a Personal Update
Many months ago Mandy of Beads for Brains and I exchanged
e-mails bemoaning the fact that a simple round beaded bead made with Delicas
never quite turned out to meet our high expectations. It seems all my efforts showed too much
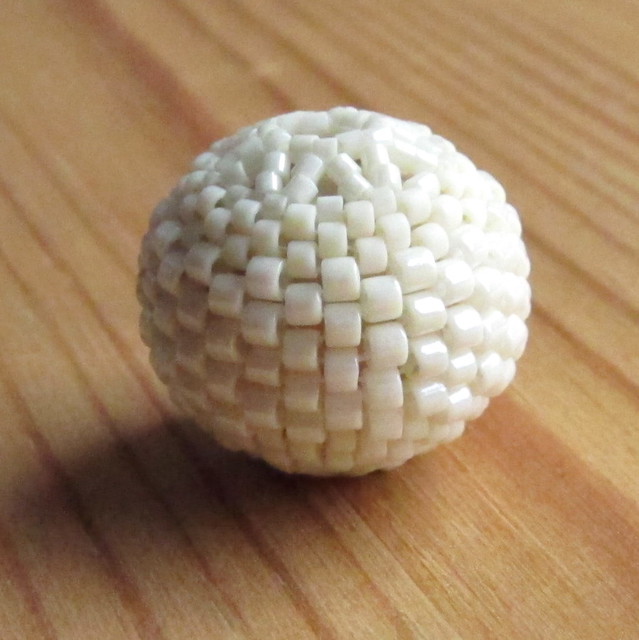
thread, the underlying bead, or was slightly unbalanced. I finally made a beaded bead that works.
Here is one that doesn’t work- notice the thread and the
bead on which it is woven?

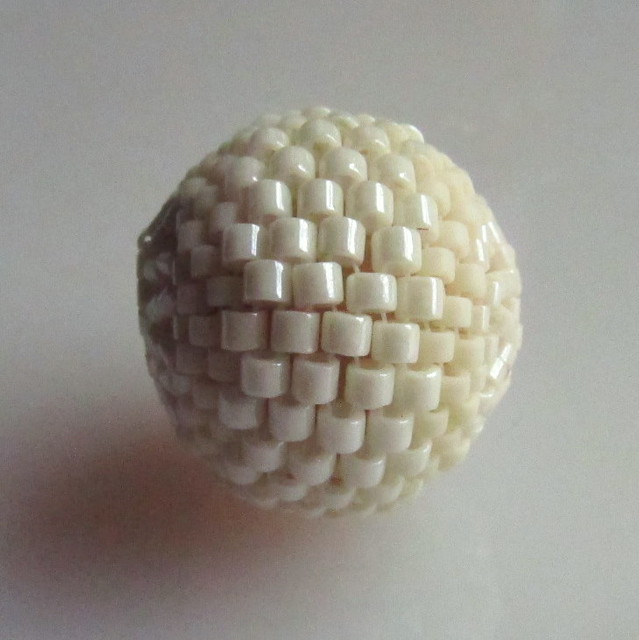
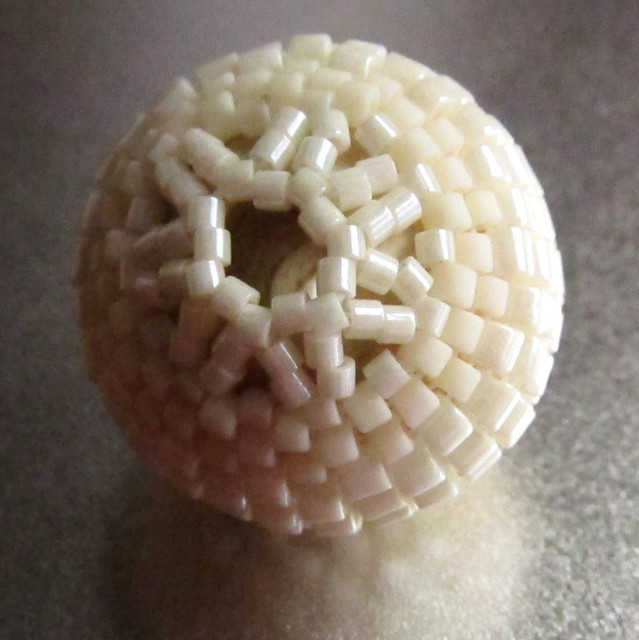
Having pointed out why it is unsatisfactory, it is only fair that also tell you that beaders that I showed this bead to thought it was just fine. Macro pictures show every slight flaw. Here is a different view of the same bead:
Here are two other views of the beaded bead that worked:
I told Mandy I would share my notes when I found them during
the process of unpacking. These are
notes, not a diagram. If you are not
familiar with peyote this is not going to be much help, if you know peyote this
is what worked for me.
You will need:
- a 5/8 inch wooden bead. Available at Michaels
- Delicas in sizes 10, 11, and 15
- Needle, Fireline (or your preferred thread)
The Beginning: Thread 29 size 10 Delicas and tie a knot
creating a circle of beads. The tail
should be equal on both sides, with needles on both sides.
Size 10 Rows: Peyote 8 rows of size 10 Delicas; that is 4
rows on one side of that original circle (for future reference this is named the north side) and 4 rows on the other side (this named the south side.)
Size 11 Rows: Peyote 2 rows of size 11 Delicas on the north
side and 1 row of size 11 Delicas on the south side of the beaded bead.
Size 15 Rows: Peyote 1 row of size 15 Delicas on the north
side and 1 row of size 15 Delicas on the south side.
Netting Rows: On the north side exit from a size 15 Delica,
add 5 size 15 Delicas, skip a size 15 Delica from the final peyote row, and
enter the next size 15 Delica from the final peyote row. Rinse and repeat. Assuming my counting is correct you should
have 7 scallops. Repeat on the south
side.
Final Row: On the north side exit through the middle (3rd)
bead of the size 15 netting row, add a bead, and enter the 3rd bead
of the next size 15 netting row, rinse and repeat. When the circle is complete pull your thread
tight and weave back through your bead work to tie your knot. Repeat on the south side.
I love this beaded bead, it is simple, it is clean, it is
even, no threads show, and I really like the top and bottom. As the top is netted you may want to try a trick I picked up on other blogs and use nail polish on your wooden bead prior to beading to give it a more finished look. Maybe at some point in the future I will draw
some diagrams. Hopefully these notes
will be enough for you to create your own unembellished and simple beaded bead. If you decide to try out these directions, please let me know what your results were like.
You may recall I recently purchased a camera. The pictures in this post were an exercise in
learning about my new camera. I am still
on that steep learning curve and hope to post about how I chose my camera in
the future. The beaded bead pictures were
done on different settings. Thus, this
blog post served two purposes: a commitment kept and a camera test. The names of the pictures include my notes on
the settings I used.
I moved this summer and had my furniture delivered in
July. I tell people I have finished unpacking;
which strictly defined means I have opened all the boxes and created a large
pile of things to be given away. I have
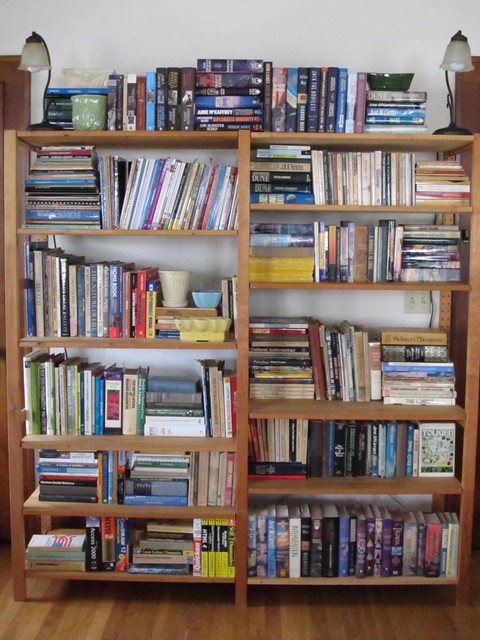
scanned all my hardback books into a spreadsheet so I know what I have. I have also washed everything, including at
least 24 curtains. What I haven’t quite
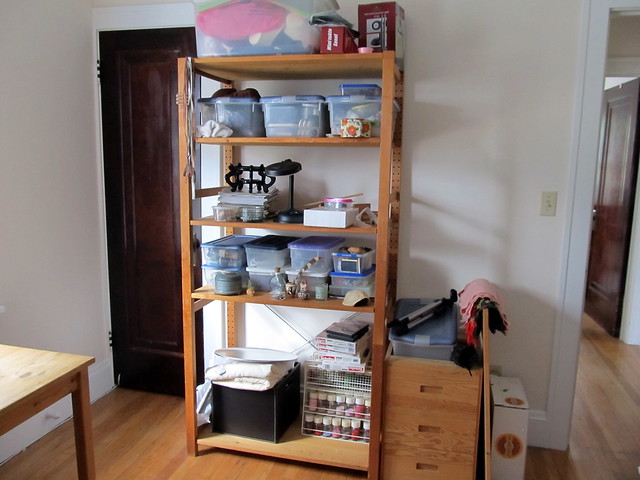
accomplished yet is getting the decorations out or my bead studio and table
organized. Also still on my to do list
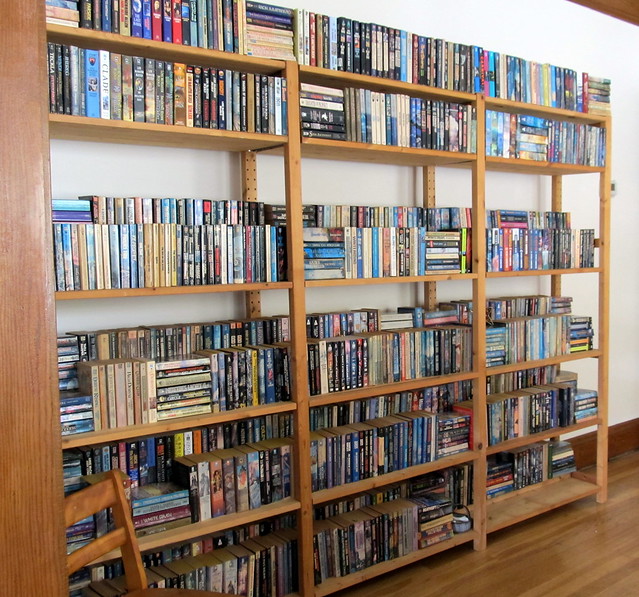
is scanning all my paperbacks and scanning the boxes of paper I have to my
computer.
To toot my horn about my accomplishments and to show you what
needs to be completed here are a few more pictures- these were taken on the “easy”
setting of my new camera.
The hardback books:
The paperback books:
My bead studio storage more is planned and necessary as these are not even my best beads:
My bead table- scattered with many things that don’t belong
and a clean corner where I took my photos this morning.

Now, it is time to go and do some organizing.
Subscribe to:
Posts (Atom)